

How To Make Animations For Second Life
My first Animation
 My first Animation

This document is about how to create your first Animation using Avastar. For the begin we will create a three frame animation. This is just to get yous started. As your experience grows you volition acquire much faster ways to pose and animate your graphic symbol.
I presume you lot have already installed Avastar. And i assume yous have some experience with Blender.
For the technician: Avastar supports .bvh and .anim format. Both formats are fully supported by Secondlife and uniform target worlds.
Preparations
How to add together a new Avastar Character - Read more...
Adding a new Avastar
You tin can add a new Avastar Graphic symbol just when Blender is in Object fashion. You navigate to the Add -> Avastar bill of fare and select from 1 of the rig types:
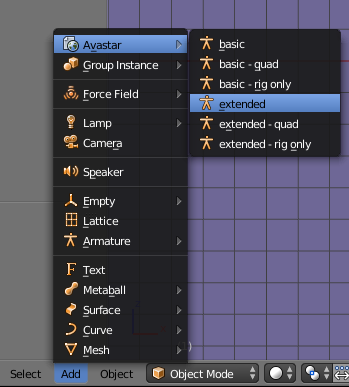

Subsequently a curt time (typically two-4 secs) a new Avastar character is created in the 3D View and at the center of the 3D View .
Now we switch to Blender'due south default Animation screen. You do this from the Summit menu Bar.
Notation: Of course you tin switch to whichever screen you prefer instead. But note that y'all volition want access to the Timeline, the 3D View, the Dope Canvass and the Properties Editor.

Details about the Animation surround
Here is an overview of Blender'due south default animation screen:

In the Dope Sheet switch the Fashion from Dope Sheet to Action Editor with the pop up menu in the header.
Hint: If the Mode Pop up menu does non brandish, and then move the mouse over the carte du jour bar of the Dope Sheet window, then press middle mouse button and while keeping the MMB pressed, elevate to the left side.

In the Action Editor mode yous can create new Actions. You observe the corresponding pop-up bill of fare in the Dope sheet menu bar:

Press the white plus sign to get a new action and name information technology "FirstAnimation".
Remind: If you do not observe the Actions menu on your screen, so MMB -> drag to the left (equally described in a higher place)
Hint: you can edit the action name right inside the pop-upwardly bill of fare.
Adjust the timeline
On the Timeline click on the first frame of your animation, for this animation set it to zero. You can do that either by dragging the green progress indicator until the position indicator displays "0", or by immediately typing "0" into the position indicator equally marked on the epitome below.
Hint: Use the curlicue wheel on your mouse to zoom the timeline in and out and the middle mouse push button (or hold downwardly Alt) to pan.

Create the Get-go frame
I assume that you are yet in Object manner now. In the 3D View make sure that you lot selected the armature by right-click on one of the rings surrounding the avatar. The rings should now announced in vivid orange.
Then switch to Pose Mode . Now all Skeleton handles appear in a greenish color. You can select whatever of these handles and move them and rotate them every bit you similar.

All the same while playing with the Pose you lot volition notation that we have placed a few constraints to the various parts of the skeleton. We did this mainly to keep you from ripping the character into pieces by dragging the bones to unrealistic positions.
Note on Rotation
The easiest mode to rotate the basic is to use the rotation manipulator controls. For your first steps you may desire to select the curve segment in the 3D Manipulator widget so Blender volition show the rotation manipulators when yous select a bone:
You may want to utilize the Rotation mode "Normal". I constitute this the well-nigh convenient mode when working with the mouse.

As y'all go more experienced with Blender you will use keyboard shortcuts more and more. Maybe y'all will even skip the 3D Manipulator after a while when you realize how efficient the usage of shortcuts really is.
More than Blitheness details
More than about Rig Display Backdrop
You lot have full control over which parts of the Rig go displayed at a given fourth dimension. You notice the Rig Brandish control console in the Object Data department of the Properties console. Beneath y'all find a comprehensive documentation.
More about the Rig Brandish
The Rig Display console gives y'all total control over which parts of the Rig can be seen at a given time. By default only the Control bones are visible. Simply sometimes it is desirable to hide or unhide parts of the Rig.
Furthermore the control bones (green) use custom shapes by default. That is, they are formed every bit rings which are placed effectually the Avastar body. The benefit of the custom shapes is that they tin be selected easier. But sometimes it is desired to switch from Custom shapes back to Blender'south default shapes (Sticks or Octahedrons).

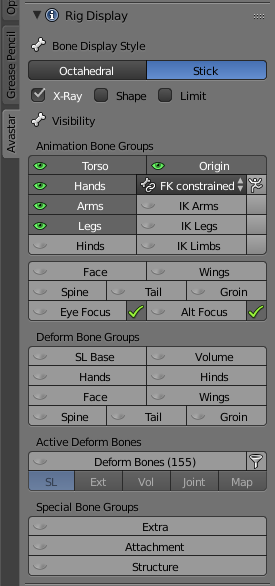
Panel Overview
The Rig panel basically contains a collection of properties which also are available at other regions in Blender. But having them all in one place is a fourth dimension saver. The panel is provided It has iv major sections:
- Bone Display style.
- Bone Visibility.
- Animation Bone Groups
- Deform Bone Groups
- Active Deform Bones
- Special Bone Groups
Os Brandish Style
The kickoff row of buttons changes the bone shape. You tin select betwixt the Octahedron Style and the Stick Style.
Note: In the Armature Data Panel (Properties Window) yous have three more options for setting the Rig display style

In the 2nd Row of the section we find 4 backdrop:
- X-ray: To display bones even when they are occluded (hidden) by the mesh.
- Shapes: To enable the usage of Custom shapes.
- Limits: To brandish the os movement ranges.
- Edges: Show edges in object style (simply if agile Object is a Mesh)
Bone Visibility
In the Bone Visibility panel you can hide/unhide various bone sets. The panel is subdivided into iv major groups as follows…
Animation Bone Groups
- Torso, Arms, Legs, Origin: These buttons command which of the Command Bones (light-green) are visible
- IK Arms, IK Legs, IK Limbs: These buttons control which of the IK Basic (yellow) are visible
- Easily, Legs, Hinds, Confront, Wings, Spine(*), Tail , Groin: Buttons for the new Bento Basic
- Eye Focus, Alt Eye Focus: A special bone used equally Focus point for the eyes. The Alt Centre Focus is for the Bento Face (Alt Eye Bones)

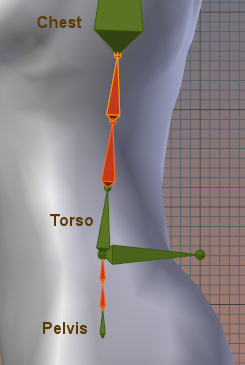
More about the Spine
The Spine is made of 4 Bones which are past default folded in such a fashion that they practise non disturb the behavior of the System Graphic symbol
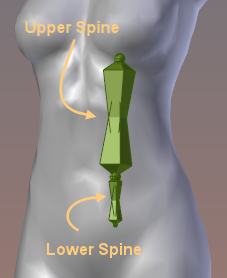
In the image aside the upper and the lower Spine bones (marked in Orange) accept been unfolded. You run into how they are embedded between the Pelvis, Torso and Chest.
Note: You lot can fold/unfold the spine from inside the Riog Command panel
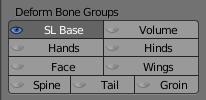
Deform Bone Groups
Display all bones which have the Deform Choice enabled. The content of this set can alter dynamically (see fitted Mesh)
- SL Base: to brandish the SL Basic (Blue)
- Volume: to display the Volume Bones
- The others: Bento Os Groups
Agile Deform Bones
The Active Deform Basic are Basic which have the "Deform Flag" set. Only Active deform Bones can modify the mesh (via skeletal animation) when they accept an associated Weightmap.
The Active Deform Bones tin can exist filtered by 5 categories:
- SL : The 26 Animation Bones for SL
- Ext: Bento Bones
- Vol : The Standoff Volume Bones
- Map : All deform bones which also have Weightmaps (only shown when a mesh is selected)
- Joint: Basic that have modified Joints (Joint Edits)

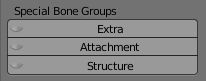
Special Os Groups
- Extra: At that place are a few Extra bones which ordinarily are not used for Blitheness in SL. These bones are either not weighted to the default Avatar (Skull, Human foot Bones and Toe Bones) or are automatically blithe (Eye Basic). Nevertheless you tin utilize these Bones in your animations for custom meshes.
- Attachment: to display the Attachment Bones (cerise)
- Structure: to display the Structure bones
More about the Skeleton
As explained to a higher place we can now move and rotate the skeleton as we similar. We see that the mesh moves along with the bone movements and we will finally end with our kickoff pose for frame zero of the animation (where you desire the bones for the get-go pose) Remind that nosotros are just moving and rotating the light-green skeleton handles for now.
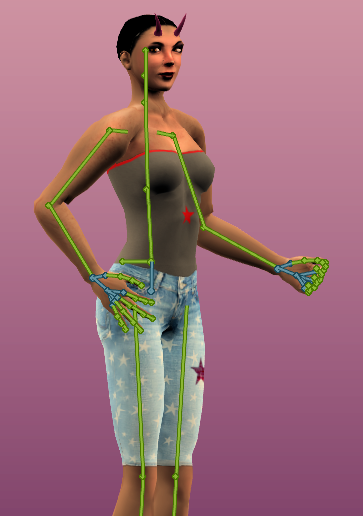
SL Command Bones
All the dark-green skeleton handles are the SL Control Bones and deed as FK (forrad-kinematic) controls. They have but been given funny shapes so they prevarication outside the avatar and are less visually distracting. When an chemical element displays in light green then it is selected and will react on your movement, scale and rotate commands. You can select single bones past right-click, or add bones to the selection past SHIFT right-click.

The Control Basic (and the IK Bones) are used for Animation.
The Avastar Skeleton has two more than Command Bones with very special backdrop:
The COG
Centre of Gravity bone. Apply this bone to gear up the location and rotation of the grapheme. Avastar adds the COG bone movements to your animation. the COG movements are afterwards mapped to the mPelvis bone of the target skeleton.
The Origin
All movements are relative to the Origin os. Moving this bone around will non affect the animation in any way. If you are doing multiple grapheme animations set their origins slightly apart to where pose assurance would get-go. Once you are happy with the location hide the bone.
SL Base Bones & Standoff Volumes
Too the (green) SL Control Bones nosotros find many other bones in the Avastar Rig. We especially have two subsets of bones named the (blue) SL Base of operations Bones . and the (orange) Standoff Volume Bones . These two subsets of Bones are only used for weighting (skinning) your character or zipper. Only they are never(!) used for animating your character.

Never directly employ the SL Base of operations Basic and the Collision Volumes for animating! Yous create Animations only with the green Control Bones and the IK Basic.
Mandatory rules
- Weight only the blue SL Basic (and the orange Volume Bones).
- Animate only the green basic (and mayhap the IK Bones).
- Never add weight to the green SL Control basic.
- Never use the blue SL Base bones for animating.
Shop the Intro Pose
Once you are happy with your first frame posture printing the a key twice in the 3D View to select all basic (it toggles the choice and then the first time it will deselect everything if you had a bone selected). The Rig should at present look similar what you run into on the image to the right.
Now printing i to insert a new primal frame. From the appearing pop-up menu select Rotation (see paradigm below).
Almost always yous will gear up just rotation key frames. The exception is if you are moving the COG or IK control basic, in which example you should set the location too with Location or LocRot for both.

Note: You do non demand to create a starting T-pose. The .anim format doesn't need it and Avastar automatically inserts the required reference frame for the BVH format.
Important: Never utilise the Keyframe choice Whole Graphic symbol ! This option would insert keyframes for all 139 bones (visible and invisible). The Avastar Blitheness exporter volition complain near too many basic in Animation.

The Action Editor
You should see the Action Editor gets populated with the bone names and a yellow diamond at frame 0.
Notation: We have simply selected all bones for our pose. This poses a potential problem:
Assume that you wanted the electric current animation to play "on meridian of" your default stand pose. In the Stand pose the avatar caput moves freely. Just after you add this animation, the caput no longer moves freely as before. It at present moves according to this animation and then the blitheness "overrides" the default head movements. If yous do not want to override the head animations, then you lot accept to remove the head data.
The easiest way to do that is to left click on the corresponding Bone name in the Action Editor("Head" in our example) and then drop the entire bone from the animation (press "10" on the keyboard).

More nigh the Action Editor ...
Muting parts of the Action
If a bone is non listed in the activity or when information technology is marked as muted it is not controlled past the blitheness.
Y'all can mute the animations for single bones by clicking on the fiddling speaker icon side by side to the bone proper noun.
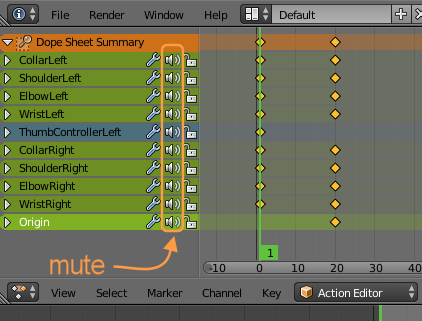
Always Mute the Origin
The Origin Bone tin be blithe in Blender. But this bone's animation can non exist used for SL Animations. Then, if you want to bank check your blitheness how information technology will look in SL, and so yous either should not at all animate the Origin bone, or at to the lowest degree mute it

Multiple Actions in ane Blend file
In more avant-garde piece of work you will come up to a betoken where you desire to maintain a few independent just related Actions for your model. Blender tin can define equally many actions as you desire within the same Blend file.
You lot create a new Action by clicking on the [+] icon in the Action selection menu.
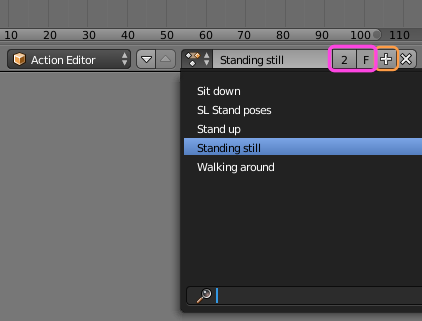
Remind: If the number of users (elements in Blender that actually use the action) drops downward to 0, so Blender will not salve the action. Y'all can detect the number of current users right to the action name (run across the pink box on the image above).
Avoid loss of Animations
Yous can instruct Blender to continue the activeness nether all circumstances past enabling the "F" icon left to the plus sign.
BTW: If you wonder what 'F' means here… That stands for Fake User (no kidding, this is Blender official notation)
Add the Ending Pose
- Lets imagine the blitheness will run at 25 fps. Click on the timeline on frame 25 which is one sec later (run across image below)
- Repose the avatar how you want it to appear one sec subsequently and again select all the bones and insert a rotation key frame ('a' to select all and 'i' to insert key frame). Do something simple like a bow or a hand wave for your first blitheness.
- Click on the timeline at 50 (ii secs into your animation), then pose and key frame the bone rotations for the terminal frame.
Hint: In the Timeline use the play buttons to preview your animation:
Hint: You also can scroll through your animation by grabbing the green time locator and drag it from left to correct and dorsum.When you want to set up intermediate key frames, and then simply motion the time locator to where you want to add a key frame, so adjust your pose and finally press a twice ( to select all bones) and then i(and select rotation)
Hint: Y'all can drib a keyframe with ALT+i but have care hither: This will only piece of work when you lot accept selected the bones which you lot want to remove from the time line. Y'all tin can always first select all basic, then ALT+i to make sure you remove the entire fundamental frame.

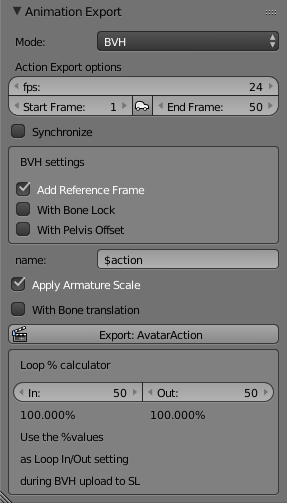
Fix the Consign for BVH
You find the "Animation Export" panel in the Render Properties section of the Backdrop window.
- Brand sure the mode is BVH
- set the FPS to 25
- Set up the Offset frame to ane
- Set the End frame to 50.
- Make sure to cheque the Prepend reference.
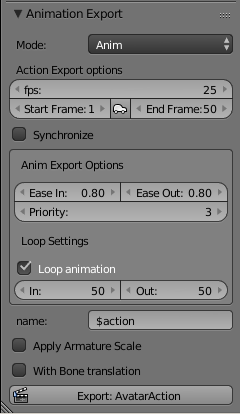
Set up the Consign for Anim
Y'all detect the "Animation Export" console in the Render Properties section of the Properties window.
- Brand sure the mode is Anim
- set the FPS to 25
- Set up the Start frame to 1
- Set the Terminate frame to 50.
- Enable Loop animation
- Set the In and Out frame to the first and cease frames of the loop. For example, utilize 1 and 50 to loop the unabridged blitheness, or utilize 50 and 50, as shown, to loop only the concluding frame.
Consign the Blitheness
- Finally, consign the blitheness by clicking on the Consign Animation button. Avastar asks you lot for a filename and location which by default will take on the name of the action yous set before.
- One time saved, burn up your Viewer, and from the file menu select Upload then Blitheness. Detect and upload your animation, it volition appear in your Animations folder. During upload you will take to choose the priority.
- Run it and show off your creation.
Note: If you lot don't see the animation play out, you lot may demand to switch off your AO. This happens if the animations in your AO have been badly designed and are running at the highest priority).
This tutorial has only scratched the surface of what is possible. Things yous will want to explore next are using the IK controls, looping function of the animation, animating only certain basic, using the Graph Editor… Experience free to download my own firstAnimation with Avastar.
Source: https://avalab.org/avastar/279/avastar-2/reference/my-first-animation/
Posted by: jacobsoulding.blogspot.com
0 Response to "How To Make Animations For Second Life"
Post a Comment