

How Big Should I Be Drawing Anime In Photoshop
This tutorial, and its second counterpart, will walk you through the process of creating a simple anime character bust from start to finish. Here nosotros focus on the cartoon side of it and creating a clean sketch, which we then render with vector to create a line fine art. You lot will demand a graphics tablet or digital drawing pad for this tutorial. Alternatively, yous will need to sketch your drawing onto newspaper and scan information technology in when we move on to the vector role in step 21. This tutorial is aimed at novices to the anime manner.
Step 1
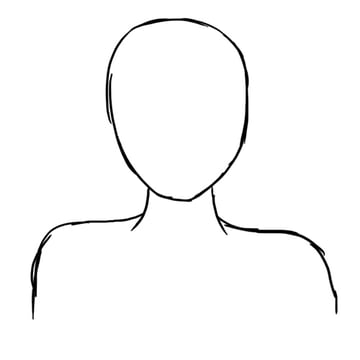
Create a New 800 ten 800px sheet (Ctrl + N) with a white background, and you're prepare to brainstorm. With whatsoever grapheme sketch, the very first thing y'all'll need to do is to depict a very rough idea of the layout. In this case the layout is for a bust, or portrait, drawing, so you'll be drawing the caput shape, neck and shoulders. It doesn't need to be anywhere nigh perfect at this indicate. Every bit yous'll see from the instance layout below, an anime character volition have a larger caput than a realistically-proportioned character, and will have a thin neck. Describe your layout on its own layer, above the white background layer, past creating a new layer (Ctrl + Shift + North) and call it "layout."

Step ii
Once you're happy with your general layout, lower the Opacity of that layer to xxx% so that y'all can still see your layout, only will also clearly see anything yous add together over the pinnacle. You'll demand to create a new layer now (Ctrl + Shift + N) for the main sketch. Proper name your new layer "sketch." Using the Ellipse Shape Tool (U) set to Paths, create a circle roughly the same size every bit the summit of the head on your layout sketch (see prototype beneath). Tip: If you hold down Shift while using the Ellipse Tool (U), y'all will create a perfect circumvolve. In one case you're happy with your circle, stroke the path using a 3px standard castor, and make sure the pen force per unit area box is unchecked. Delete the path after this. Then, add a small-scale line where the center of the character's chin would exist.


Step 3
Using the Pen Tool (P), start a new path from the middle of your chin line up to where the border of your circle touches the lower part of the head on your original layout. Do this both sides of the head so information technology looks like the case on the left of the image below. So, by adding a indicate to the heart of each path and dragging them outwards, curve the paths a lilliputian to follow your layout. This creates the cheeks and lower office of your character's head.


Pace 4
You can now stroke the two paths you lot just made with the same 3px standard brush you lot used for the circle. The example is washed in red to show the new lines, but y'all tin can go on yours in black. This basic method from the past few steps is a good foundation for creating a general anime-style shaped head, as the circle office will generally stay the aforementioned, and the cheek lines will change depending on the placement of the chin line. Further tutorials of mine will show you how to draw characters from diverse angles, just for now, nosotros'll focus on a basic front end-facing bosom like this one.


Step v
Create a new layer (Ctrl + Shift + N) above your current layers and proper noun it "guides." This layer wont be role of the final cartoon, but volition help yous with the placement of the facial features. Draw a red line from the very bottom of the main circle across the whole caput shape. The center of the olfactory organ and the centre of the mouth will exist equidistant from this cherry line, which is what the blue lines on the example below represent. Every bit you become familiar with cartoon in the anime way, you lot may non need to e'er add these guides, and as your ain sketch may be a unlike size to mine, I can't give an exact distance to add the guidelines, so for now, add yours so they appear a similar altitude from the red line every bit mine.


Step 6
Next, depict another blueish line across where your cheek lines meet the circle (the height blueish line on the example below). This is where the top of the character's optics will start. The concluding blue line will human action as a guide for where the bottom of the eyes volition be. Mine is the same distance above the nose line as the nose line is from the original red line. Y'all tin experiment with different sizes and styles of optics, but for now, add yours in roughly the aforementioned place.


Step 7
Hide your "guides" layer. Erase the lesser half of the circumvolve that would be inside the head shape, and neaten your chin line a little. You tin can too now add the remainder of the master sketch to the "sketch" layer. Use the Pen Tool (P) to copy your layout and create make clean and piece of cake-to-follow lines like you did with the head shape, stroking the paths with a 3px standard castor. This is the phase to set anything if it doesn't seem right to you. Once you're happy with it, you can hide your original layout layer, and you'll be left with something similar to the example below.


Step viii
The next thing nosotros'll be working on is the face up. In an anime drawing, the eyes are frequently an important and defining factor of the image, so I've given a few examples of different styles of eye that y'all could try for your cartoon. Female characters often have eyelashes of some sort, and male characters tend not to. I'one thousand making mine a female character, but you lot can cull to create a male person character if you lot prefer.


Stride 9
Unhide your "guides" layer, become rid of the red line, and lower the Opacity of the layer. I've desaturated my "guides" layer too, which you can do if you lot prefer. The eyes will be fatigued between the ii guide lines we added for them, and don't forget to add a pocket-sized line above for the eyelid, as shown on the examples above and below. Noses and mouths are often very simple in the anime style and can announced more similar symbols to stand for the features rather than being particularly detailed. The nose I accept drawn is a simple triangle shape with a minor dot next to it to represent a nostril. The mouth is a line, curving up at each terminate, with a small gap in the eye. I've besides added a modest line below the mouth line to propose the bottom of the lip. Utilise your guidelines to help you with the placement, and hide or delete the "guides" layer once you're happy with what you've drawn for the confront.


Step 10
Now nosotros're going to work on giving the character some wearable. As the tutorial doesn't specifically cover a male or female character, the wearable nosotros're going to add to the character volition be adequately androgynous - a shirt, jacket and necktie. Create a new layer (Ctrl + Shift + N) to a higher place your other layers and name it "clothes1." When sketching over the top of another sketch every bit we will practice now, I adopt to use cerise so it is easy to differentiate. As the images below explain, offset nosotros'll add together a V-shape round the neck that overlaps a lilliputian at the bottom. This is the within of the jacket. Next, add the jacket breast past adding curved triangular shapes outside the original V-shape. I've given mine piddling triangle cut-outs for added involvement. Don't forget to add the habiliment in a higher place the shoulders to give dimension so information technology doesn't appear the wear is simply painted onto the character. Add two triangles inside the jacket for the shirt, and and so draw a tie shape beneath. Two curved lines either side of the jacket breast to show the character's arms, and carry on the main sketch down to the bottom of the canvas (come across example five beneath). Finally, add together some lines at the shoulders to show seam-lines, and lines to show folds at the armpits and in the crook of the tie.


Stride 11
I've also added a few extra bits of detailing to the jacket on my character, firstly to make it a little more than interesting, but besides to make it more than feminine as I am drawing a female person character. In one case you're happy with your jacket, you can make the sketch black.


Step 12
On another new layer (Ctrl + Shift + N), which you can phone call "hair1," sketch out how you'd like the hair of your character to look. I have called a medium-length fashion with bangs, and ponytails to the side. This initial sketch doesn't need to be peculiarly neat, as you can run across. You lot're really just getting an thought for the catamenia and shape of the hair here, and you'll create a clean, neat sketch later.


Stride 13
Here's some suggestions for other pilus styles you could try for your graphic symbol. If you're drawing a male person character, try the top correct pilus style, or brand up your ain. Once you're happy with the hair you've sketched out, turn the sketch black.


Step 14
Hide your "hair1" layer for a fleck while nosotros make the vesture sketches a bit neater and easier to follow. Create a new layer (Ctrl + Shift + N) and call information technology "clothes2", while making your "clothes1" layer effectually 30% Opacity. On your new "clothes2" layer, and using the red color once again, start making a nice clean sketch. I used the Pen Tool (P) and Stroke-Path method for this, once again with a 3px standard brush.


Pace 15
In one case you've finished cartoon your new make clean sketch, you can hide the "clothes1" layer, leaving you with something similar to the example below. Now you'll need to erase whatsoever overlapping lines that shouldn't exist at that place, such as the neck and shoulders on your "sketch" layer which would exist hidden by the wearable. This is where doing your "clothes2" sketch in red and on a separate layer is quite useful, every bit information technology makes it much easier to see where you need to erase.


Stride xvi
One time you lot've erased any surplus lines and are happy with how it looks, make your "clothes2" sketch black, and merge it down equally part of your "sketch" layer. You can delete your "clothes1" layer now. You should now accept something similar to the cartoon below, which means we're ready to work on the hair.


Pace 17
As you've done with previous layers, you'll need to unhide your "hair1" layer and lower the Opacity to 30%. Create a new layer (Ctrl + Shift + N) in a higher place chosen "hair2" and, using the cerise and a 3px standard brush, create your clean sketch. Remember it'southward however merely a sketch, and nosotros're going to brand the line art next, so yous don't demand to worry if it looks a piddling messy at this phase. We're but building a foundation that will be easy to work from when it comes to the vector rendering.


Step 18
In one case you've finished making your new hair sketch, you can delete the "hair1" layer. At present yous'll need to erase any surplus lines from your "sketch" layer that would be covered by hair, similar you did for the clothing. In this example, it will be the sides of the head and some of the clothing where the longer bangs are in front.


Footstep 19
Once y'all've erased the lines y'all need to, you can plough the "hair2" sketch blackness, and merge the layer downwards into the "sketch" layer. All your visible sketches should be on the aforementioned "sketch" layer at present, and any hidden layers you accept left, if whatsoever, can exist deleted.


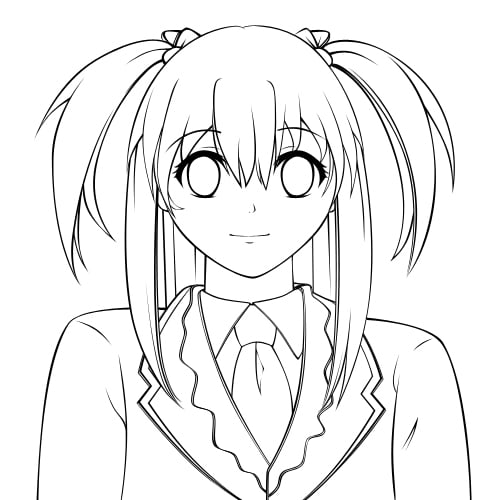
Pace twenty
This is the terminal phase of creating a clean sketch to follow, which is calculation any details needed before we move on to line art, and then on to color in role two of this tutorial set up. These concluding details include calculation the pupils and highlights to the optics, making sure your character has ears where they would be visible, adding eyebrows, bows to the hair, and whatsoever other final additions or changes you lot'd like to make to your sketch earlier you lot render it.


Step 21
In one case y'all're happy with your final sketch, yous can make sure its all merged into i sketch layer, and and so make that layer 30% Opacity. Now y'all'll need to create a binder to a higher place your sketch and white groundwork layer for your vector piece of work, to assist organize your layers. To practice this, click the folder-shaped icon at the lesser of the layers tab, which should say "Create a new grouping" on hover. Name this folder "vector." You'll need to make sure, next, that your Pen Tool (P) options are set up to create vector shapes every bit we no longer need the Paths selection nosotros used for the sketches. Check your options with those shown in the image below.


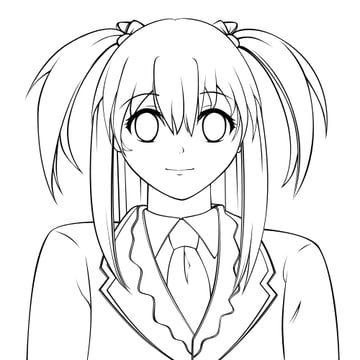
Step 22
Using the Pen Tool (P), begin tracing your sketch. I similar to commencement with the face every bit it builds a good foundation for the general await of your graphic symbol, I feel. Don't add line fine art for the pupils or highlights in the optics - we'll do those when it comes to the coloring stage in the next tutorial.


Footstep 23
As yous're working, lower the opacity of your sketch layer every at present and and then to run across how your line work is coming along.


Step 24
The line art stage is the time to add the little details. In this case, I have added secondary lines round the edges of the jacket hither, because remember that wearing apparel are not flat - they are three dimensional objects, and will have visible edges!


Step 25
Proceed working on your lines, and take your time to make sure they await correct. I have changed the position of the indent on the right hand side of the jacket so it looks more even. Don't be afraid to deviate from your sketch if you lot need to. Remember the edges, and keep adding the detail and depth to the cartoon.


Pace 26
Once you've finished the lines for the face and jacket, you may wish to create a folder for them within your vector folder and name information technology "other lines" for example, and move these line fine art shape layers into the new folder. I generally like to proceed the pilus lines and the other lines separate and volition create a new binder for the pilus lines just now, called "hair lines." This is completely up to yous - I just adopt to go on my layers organized in this way.


Stride 27
When you lot move on to the pilus lines, start with the summit of the caput and the bangs every bit you volition find the residue of the hair easier one time y'all have these down. I've added a departing at the top of the head, as you can see below, which is another manner to add that trivial extra fleck of particular to your anime grapheme.


Step 28
I've deviated from my sketch a little on the bangs to give a better shape. I've also added particular past overlapping strands on the left mitt side, over her cheek, and by using varied line widths. Continue with this method of creating the line art for the hair, and don't worry about the overlapping lines further down where the hair comes downward over the clothing - nosotros'll sort that in the next step.


Step 29
Where your lines overlap, such as the hair in front of the shoulder here, rather than stopping and starting your lines, y'all can use the Subtract from shape area tool (-), which is the middle icon, highlighted in blue in the example tool bar below. You will find this on your regular Pen Tool (P) options forth the top of your regular program page.


Footstep 30
With the Decrease from shape area icon, shown above, clicked, draw a pocket-sized box around the area of line you wish to remove, and it volition exist erased from view. Practise this to all the areas y'all need to remove overlapping lines. This method is not only easier than trying to create 'stop-commencement' line art around overlapping features such every bit hair, only besides gives a much smoother cease.


Step 31
Once you're done with the hair, become dorsum to your other lines folder - if you made one - and add the bows and ears to your grapheme, remembering that bows will have creases in the middle where the cloth folds. One time y'all're happy with the lines you've created, create a folder named "lines" inside the "vector" folder, and add together either all your shape layers, or your folders, depending on how you lot've organized them, to this new folder. Y'all can hide the "sketch" layer at present.
Determination
Congratulations! Y'all take now created a basic anime styled portrait line fine art, ready to color in function two. I'd love to see the characters you've created, and I hope you enjoyed this tutorial. You lot're now set up to bank check out function two of this tutorial!
Source: https://design.tutsplus.com/tutorials/creating-a-vector-anime-character-in-adobe-photoshop-part-1-sketch-and-line-art--vector-8762
Posted by: jacobsoulding.blogspot.com
0 Response to "How Big Should I Be Drawing Anime In Photoshop"
Post a Comment